Add free search for your website. Sign up now! https://webveta.alightservices.com/
Categories
.Net C#

Programatically configuring NLog in C#

Some people for various reasons might prefer programatically configuring NLog. Some use cases are for example, may be you don’t want to store sensitive information in nlog.config file. Some of the targets that require sensitive information in the config file are (Not an exhaustive list):

You might want to store the sensitive information somewhere else in an encrypted format. Then you might decrypt the password and programmatically configure the logger. Here is some code sample on how to configure such loggers.

var logConfig = new LoggingConfiguration();

//File
var fileTarget = new FileTarget
    {
        FileName=typeof(Program).FullName + ".log"
    };

fileTarget.Layout = @"${date:format=HH\:mm\:ss} ${logger}:${message};${exception}";

var fileRule = new LoggingRule("*", LogLevel.Debug, fileTarget);
logConfig.LoggingRules.Add(fileRule);
logConfig.AddTarget("logfile", fileTarget);

//DB
var dbTarget = new DatabaseTarget();

dbTarget.ConnectionString = YourSecureMethodForDecryptingAndObtainingConnectionString();

dbTarget.CommandText = @"INSERT INTO [Log] (Date, Thread, Level, Logger, Message, Exception) VALUES (GETDATE(), @thread, @level, @logger, @message, @exception)";

dbTarget.Parameters.Add(new DatabaseParameterInfo("@thread", new NLog.Layouts.SimpleLayout("${threadid}")));

.
.
.
logConfig.AddTarget("database", dbTarget);
var dbRule = new LoggingRule("*", LogLevel.Debug, dbTarget);
logConfig.LoggingRules.Add(dbRule);


LogManager.Configuration = logConfig;

In the above sample code, we have looked into how to add multiple types of targets – File and DB. How to set the layout for the FileTarget. How to configure logging rules and finally how to assign the programmatic config.

An interesting target is the Memory target, allows writing log messages to an ArrayList in memory for programmatic retrieval. Great for unit testing.

There are some code samples in the above mentioned link for Memory target.

Categories
.Net AWS C# CI/CD Code Build Github

How to setup CI/CD for C# application in AWS Lambda

In this blog post, I am going to write how to setup a CI (Continuous Integration)/CD (Continuous Deployment) pipeline for C# application in AWS Lambda.

The source code repository can be either be Github, AWS CodeStar. Then we are going to use CodeBuild for setting up build by writing a YAML file in the root of source code repository known as buildspec.yml.

Inside the buildspec.yml file, we would use dotnet lambda tool for the deployment.

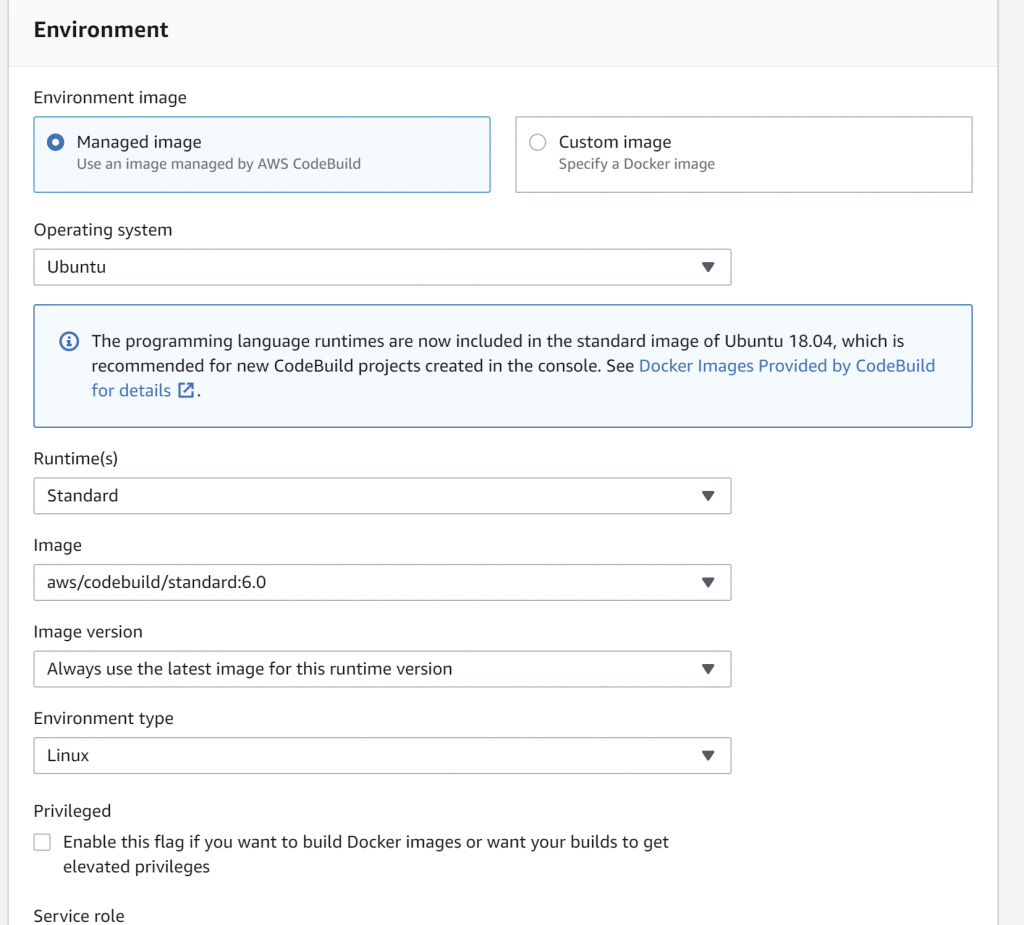
Create a new AWS CodeBuild Project by choosing the source provider and the other options. Use the Managed Image, Ubuntu, Standard, aws/codebuild/standard:6.0 image. Make note of the new role created or if using existing role, make note of the role.

Create a new Lambda function with a .Net 6.0 runtime, make note of the IAM role for the Lambda function and the name of the Lambda function. The buildspec.yml mentioned below assumes the lambda function has a name of LambdaFunctionName and the role arn:aws:iam::xxxxxx:role/service-role/xxxxrole.

The following is an example buildspec.yml file:

version: 0.1
env:
  variables:
    DOTNET_ROOT: /root/.dotnet
phases:
  install:
    runtime-versions:
      dotnet: 6.0
  pre_build:
    commands:
      - echo Restore started on `date`
      - export PATH="$PATH:/root/.dotnet/tools"
      - pip install --upgrade awscli
      - cd Project1
      - dotnet clean
      - dotnet build
      - dotnet test
  build:
    commands:
      - echo Build started on `date`
      - dotnet new -i Amazon.Lambda.Templates::*
      - dotnet tool install -g Amazon.Lambda.Tools
      - dotnet tool update -g Amazon.Lambda.Tools
      - dotnet lambda deploy-function "LambdaFunctionName" --function-role "arn:aws:iam::xxxxxx:role/service-role/xxxxrole" --region "eu-west-2" --fn "LambdaFunctionName"

In the above buildspec.yml file sample, we are using .Net 6, navigating to the folder where the .sln file is located, and doing a clean, restore, build and test. Once these steps have passed, we are installing AWS Lambda tools, using lambda deploy-function for deploying.

Remember to change the cd statement to the appropriate folder structure to navigate to the folder which contains your .sln solution file, the Lambda Function Name and the IAM role of the Lambda Function in the above buildspec.yml file.

We still need to grant permissions for the role under which the build is running the permissions to deploy the code to Lambda. Now navigate to IAM and either create a custom policy or attach an inline policy directly to the CodeBuild role.

In the below screenshot, I have attached an inline policy:

That’s all for now! Happy coding my dear fellow developers!

Meanwhile, terrorist Veera, Bandhavi, Erra surnamed people, Uttam, the female who claims to have a first name of Kanti would be happily hacking, violating human rights and doing identity theft.

We need to secure our applications and our users from such malicious hackers/spies/terrorists and prevent espionage.

Categories
Welcome

NLog in .Net Applications

NLog in .Net Applications

The source code can be obtained from: https://github.com/ALightTechnologyAndServicesLimited/NLogSampleDemo001

NLog is a structured logging framework for .Net. NLog is highly extensible, configurable and supports lot of plugins. This post is about some basic usage of NLog, we won’t be discussing any of the advanced features. NLog can be added via nuget package. There are several ways to configure NLog, the documentation can be found here.

NLog supports several built-in Targets such as Console, File, Database etc…, the list of layouts are found here. Some of my favorite targets are: Console, File, Database, BufferingWrapper, AsyncWrapper, AspNetBufferingWrapper, FallbackGroup, RetryingWrapper, ElasticSearch, EventLog, FluentD, MicrosoftTeams, Amazon CloudWatch, Amazon SNS, Amazon SQS, Microsoft Azure ApplicationInsights, Microsoft Azure Blob Storage, Microsoft Azure DataTables Storage, Microsoft Azure FileSystem, Microsoft Azure Queue Storage, Memory, Network, WebService, MessageBox and many more. All the targets are very well documented.

Layouts allow custom layout of log messages and can be viewed here.

Layout Renders are very useful and can be used to determine exactly what information needs to be captured and can be found here. Determining the proper information to capture helps in troubleshooting issues.

In this post, we are going to discuss how to integrate NLog into a console application and how to inject logger into a class for use.

We start off by adding the required nuget packages:

NLog
NLog.Extensions.Logging
Microsoft.Extensions.Configuration.Json
Microsoft.Extensions.DependencyInjection

//packages can be added using the syntax below from .Net CLI
> dotnet add package <package_name>
// optionally the version can be specified via --version flag
// As of the date of this blog post, the following commands would add the latest packages.

> dotnet add package NLog --version 5.0.1
> dotnet add package NLog.Extensions.Logging --version 5.0.0
> dotnet add package Microsoft.Extensions.Configuration.Json --version 7.0.0-preview.5.22301.12
> dotnet add package Microsoft.Extensions.DependencyInjection --version 7.0.0-preview.5.22301.12

Next we will create a nlog.config file with the following content:

<?xml version="1.0" encoding="utf-8" ?>
<!-- XSD manual extracted from package NLog.Schema: https://www.nuget.org/packages/NLog.Schema-->
<nlog xmlns="http://www.nlog-project.org/schemas/NLog.xsd" xsi:schemaLocation="NLog NLog.xsd"
      xmlns:xsi="http://www.w3.org/2001/XMLSchema-instance"
      autoReload="true"
      internalLogFile="c:\temp\logs\nlog-internal.log"
      internalLogLevel="Info" >

  <!-- the targets to write to -->
  <targets>
    <!-- write logs to file -->
    <target xsi:type="File" name="logfile" fileName="c:\temp\logs\logs.log"
            layout="${longdate}|${level}|${message} |${all-event-properties} ${exception:format=tostring}" />
    <target xsi:type="Console" name="logconsole"
            layout="${longdate}|${level}|${message} |${all-event-properties} ${exception:format=tostring}" />
  </targets>

  <!-- rules to map from logger name to target -->
  <rules>
    <logger name="*" minlevel="Trace" writeTo="logfile,logconsole" />
  </rules>
</nlog>

I personally prefer creating environment specific nlog.config files, so a file with the name nlog.Development.config can be created for Development specific configuration. We will see some code snippets further in this blog for using environment specific config file. Remember to set the copyToOutput value to Always.

Now we will add a sample Interface and called IMyInterface

public interface IMyInterface
{
   void PrintHello();
}

Now will add a class that implements IMyInterface known as MyClass

public class MyClass : IMyInterface
{
   private readonly ILogger<MyClass> logger;

   public MyClass(ILogger<MyClass> logger)
   {
      this.logger = logger;
      logger.LogDebug("Constructor Invoked.");
   }

   public void PrintHello()
   {
      logger.LogDebug("PrintHello Invoked.");
      Console.WriteLine("Hello!");
   }
}

Now for the main, The following list of usings are used.

using Microsoft.Extensions.Configuration;
using Microsoft.Extensions.DependencyInjection;
using Microsoft.Extensions.Logging;
using NLog;
using NLog.Extensions.Logging;

Now the actual code:

var logger = LogManager.GetCurrentClassLogger();

try
{
    var environment = Environment.GetEnvironmentVariable("DOTNET_ENVIRONMENT");
    var configBuilder = new ConfigurationBuilder()
           .SetBasePath(System.IO.Directory.GetCurrentDirectory())
           .AddJsonFile("appsettings.json", optional: false, reloadOnChange: true);
    var nlogConfigFileName = "nlog.config";

    if (!String.IsNullOrEmpty(environment))
    {
        configBuilder.AddJsonFile($"appsettings.json", optional: true, reloadOnChange: true);
        nlogConfigFileName = $"nlog.{environment}.config";
    }

    var config = configBuilder.Build();

    
    var servicesProvider = new ServiceCollection()
       .AddTransient<IMyInterface, MyClass>()
// Add Additional Services i.e bind interfaces to classes
       .AddLogging(loggingBuilder =>
       {
           // configure Logging with NLog
           loggingBuilder.ClearProviders();
           loggingBuilder.SetMinimumLevel(Microsoft.Extensions.Logging.LogLevel.Trace);
           loggingBuilder.AddNLog(nlogConfigFileName);
       })
       .BuildServiceProvider();

   using(servicesProvider as IDisposable)
      {
         var myInterface = servicesProvider.GetRequiredService<IMyInterface>();
        myInterface.PrintHello();
  }
}
catch(Exception e)
{
    logger.Error(e, "Stopped program because of exception");
    throw;
}
finally
{
    LogManager.Shutdown();
}

In the above code, we assume DOTNET_ENVIRONMENT environment variable holds information about the environment. ASPNETCORE_ENVIRONMENT environment variable is used for ASP.Net core applications. Another assumption is that the appsetting.[ENVIRONMENT].json holds environment specific information that needs to be over-written and of course, we specified the appsettings.[ENVIRONMENT].json file as optional.

We are specifying the nlog.[ENVIRONMENT].config to be used for NLog logging. If needed, some additional code can be added for verifying the file exists. This way we can have seperate NLog config files for each environment.

Now using dependency injection ILogger<classname> can be injeced into the constructor of the class and the logger gets injected through dependency injection. For example:

using Microsoft.Extensions.Logging;

public class MyClass : IMyInterface {
   private ILogger<MyClass> logger;

   public MyClass(ILogger<MyClass> logger){
      this.logger = logger;

      logger.LogDebug("Message");
   }
}

The source code can be obtained from: https://github.com/ALightTechnologyAndServicesLimited/NLogSampleDemo001

NLog in .Net Applications

Categories
.Net UnitTests

Code coverage in .Net

This blog post can be considered obsolete. OpenCover tool has been archived. Refer to this blog post for latest:

Code coverage in .Net

This blog post covers code coverage in .Net. Particularly we would be discussing about code coverage using NUnit, OpenCover, ReportGenerator tools.

For the sake of this discusson we would assume we have some projects in the following namespaces:

Project1.Facade;

Project1.App

Project1.Service

Project1.Facade.Tests – NUnit Test Project

Project1.Service.Tests – NUnit Test Project

First we would need to run the tests using NUnit console test runner. The NUnit Console Test Runner can be downloaded from here under releases section. The assumption is the package has been installed under C:\ drive and C:\NUnit\nunit-console\nunit3-console.exe exists, if not adjust the path as necessary.

Create a batch file and call it “RunTests.bat” with the following content:

C:\NUnit\nunit-console\nunit3-console.exe .\Project1.Facade.Tests\bin\Debug\net6.0\Project1.Facade.Tests.dll
C:\NUnit\nunit-console\nunit3-console.exe .\Project1.Service.Tests\bin\Debug\net6.0\Project1.Service.Tests.dll

Now we will create another batch file “CodeCoverage.bat” for the commands for OpenCover and ReportGenerator. The assumption is that OpenCover and ReportGenerator have been installed at the following locations:

C:\OpenCover\OpenCover.Console.exe, C:\ReportGenerator\net6.0\ReportGenerator.exe.

The content of batch file would be:

C:\OpenCover\OpenCover.Console.exe -target:.\RunTests.bat -register:user -filter:"+[Project1*]* -[Project1*Tests]*" -oldstyle -mergeOutput

C:\ReportGenerator\net6.0\ReportGenerator.exe -reports:results.xml -targetdir:coverage

start .\coverage\index.htm

We first have OpenCover run the RunTests.bat it collects some data and generates results.xml file. The important parameters are the -filter, -oldstyle, -mergeOutput. The results.xml file becomes the input of ReportGenerator. ReportGeerator generates some reports and saves inside a directory by the name of coverage.

The last command opens the index.html file from the generated report.

A bunch of log files, xml files are generated during these. Assuming there are no other xml or log files, these can be removed easily by adding appropriate del commands in the second batch file.

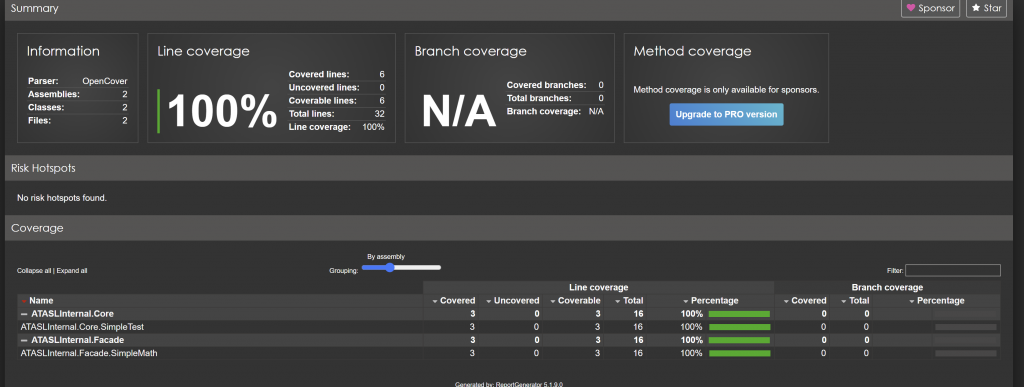
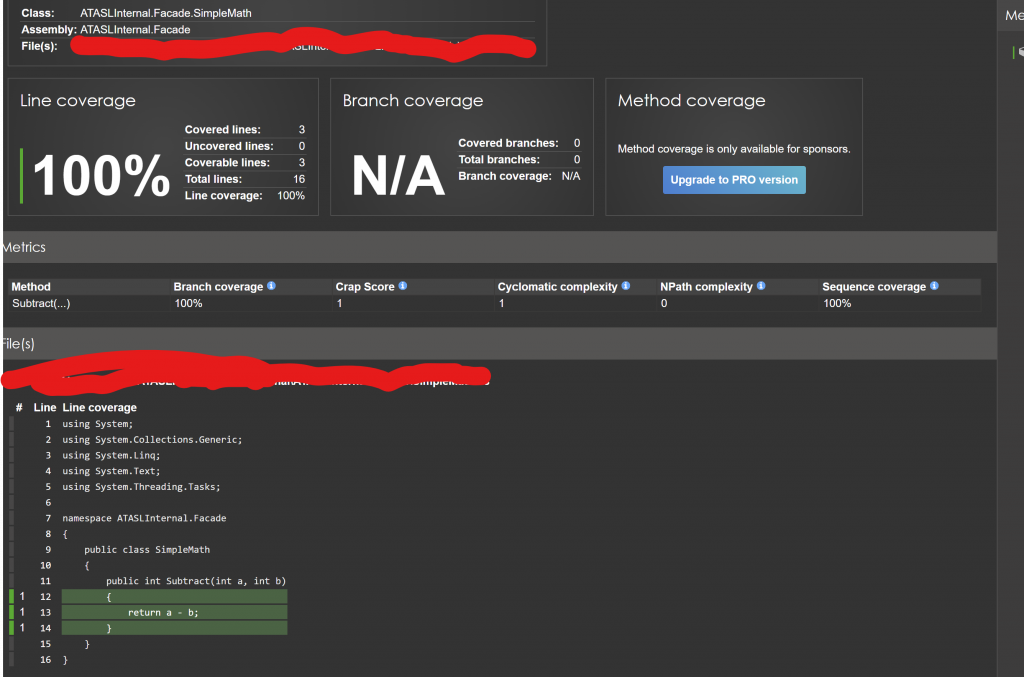
The project structure is slightly different, but some sample Add and Subtract example screenshots can be seen below:

Hoping this post helps someone in improving coding practices! Worked a little bit late into the night, I work for myself – for my own startup, no worries!

Code coverage in .Net

Categories
AWS Security

AWS – Discouraging the use of CLI!

AWS – Discouraging the use of CLI!

After much thought and consideration, I think the use of AWS CLI should be discouraged unless a very very strong VPN authentication and pro-active monitoring are in place.

The reason is, more and more workforce are working remote, accessing the cloud remotely. If VPN connections are not properly secured and monitored, with today’s advanced spying equipment being used by spies for espionage (unfortunately in my case, identity thief R&AW spies are hacking me (Indian citizen) for cover-up of identity theft), it becomes extremely easy for them to log into VPN. And even with restrictions in place, stealing Access Key and Secret Key would be much easier.

Remember the advanced spying equipment has very advanced capabilities: viewing, recording video, screenshotting, listening, recording audio, whispering and even mind-reading capabilities. Lookup https://www.alightservices.com, Corrupted R&AW online – not associated – ALight Technology And Services Limited (alightservices.com),

https://www.simplepro.site/

And the female R&AW agent needs to frame someone as a “ok” or “okay” or “oray” or whatever because the female with the first name of “Kanti” is an identity thief and needs to frame someone or make some absurd claims.

Some of the greedy/criminal people have accepted to act as the so-called non-existent “ok” or “okay” for getting access to the advanced spying equipment – peeping toms, because the female controls the spying equipment.Simple and striaghtforward logic.

Another most important consideration must be no sensitive information should be displayed on the screen.

Accessing AWS services by using properly tested and secure applications that have proper audit and logging should not be a problem in most scenarios.

Hypothetically, let’s say some sensitive data is stored in some dynamodb table and even if read-only permission is provided for access via CLI by using Secret Key and Access Key, there is a possibility of the data getting stolen. But in a proper well-tested application, the sensitive data might not be even displayed or even if displayed may be only masked data would be displayed. Or may even in some very rare cases, the actual data and masked data might be stored separately and maybe the applications just reads the masked data.

For example, irrespective of whether the data is stored in RDBMS or NoSQL database, in a hypothetical situation if some data like credit card number is being stored in a database and some page has to show 100 masked credit card numbers. It would be risky and even cpu consuming to decrypt 100 credit card numbers, and then calculate the masked values. Worst case scenario, if searching millions of encrypted credit card numbers based on last 4 digits. It’s safer to store the last 4 digits.

At least in ALight Technology And Services Limited, I would personally discourage the usage of CLI in most scenarios.

AWS – Discouraging the use of CLI!

Categories
Architecture Security SimplePass

An Architecture for Secure communication between two clients!

In the world of computing, we are familiar with and understand the need for secure communications and secure data transfer. When using public-private keypairs, the public key is provided and the data is encrypted using the public key, transmitted and then the private key is used for decryption.

In this article, we will discuss an approach for securely pairing two clients that can’t communicate directly and for securely communicating with the clients using a server. In this example, let’s say we have a web server, two instances of an application that has some offline data (data not stored on the server), the two clients have to pair anonymously without providing much information to the server and need to transfer some sensitive data.

This is a sample tech implementation that can be implemented in SimplePass for synchronization between devices, without exporting file, copying file and importing. Remember, SimplePass does not need any account creation, so what the application server knows about you is absolutely nothing. SimplePass does not even collect emails. Assuming complete safety, privacy are needed for applications, this blog post suggests a way to get this accomplished. This approach requires minimal server processing and memory needs and no information is stored on the server. This feature is not implemented in SimplePass yet and I don’t have any plans of implementing in the near term, but thought of sharing the idea.

For this example, we will say the first instance of the client application that needs to send data as “sender”, the client application that needs to receive data as “receiver”, a web server capable of sending push notifications or being able to hold some key-value pairs in memory.

The tasks that need to be accomplished are:

  1. Securely pair the sender and receiver without giving away too much information to the server but with the server’s help.
  2. Securely communicate data from sender to helper with the server’s help.

  1. When the user of “sender” needs to send data, they need to pair with the target “receiver”. They would open a section of the client application, generate a random code – for example “abcd1234” and synch with the server.
  2. A request to the server is sent with the client ID, and the generated random code. The server would hold a unique ID for this transaction and a data structure with the client ID, unique ID as properties and some kind of a time-out let’s say 15 minutes. If the random code exists in the server’s dictionary, the request would be rejected.
  3. The user would use the second device -“receiver” and enter the unique ID from the “sender” device, generates another “receiver” specific random code And synchs with the server. For example let’s say “zxcv0987” is the “receiver” random code.
  4. The “receiver” would also generate a public/private key-pair, and uploads the public key-pair to the server.
  5. The server looks up its internal data dictionary for the “sender” requested random code, the “sender” random code has to exist and there can be multiple “receiver” random codes, but the “receiver” random codes need to be unique. The server holds each “receiver”‘s random code and public key in memory.
  6. The “sender” application displays the list pairing request “receivers” random code, here in this case – “zxcv0987”. The “sender” would approve the “receiver” random code. If an unknown “receiver” random code gets visible, the user can safely assume his communications and activities are being monitored by hackers such as Uttam, Thota Veera, Thota Bandhavi, Cuban Michael or Ray, Karan/Diwakar/Karunakar and whoever is an “is”, “already”, “ek”, “es” or any other hacker or any other spy, and the user can deny the unrecognized codes.
  7. Steps 3 – 5 can be done when trying to synchronize with multiple devices and the same level of security and privacy can be applied.
  8. Now the “sender” would click something like export. The “sender” application receives the list of public keys for each approved “receiver”. The “sender” encrypts data using the public key for each “receiver” and sends the data to the server, the “receiver” receives the data and decrypts using its own private key for the session.
  9. The “receiver” after decrypting data, tells the server to clean up and all related resources for the “receiver” can be cleaned up.
  10. All of the above steps need to be performed within the set time-out, to minimize the resource usage on the server.

In the above scenario, the server is holding some data that it can’t even read because the server does not have a private key. The only processing happening on the server are some key lookups – very minimal computing. Even the memory requirements for holding the ID, random codes and public key are minimal. In the approach described above complete privacy, security, and hacker-proof are maintained with minimal memory and CPU usage.

There is a flaw in today’s OTP/Authentication codes i.e if server side apps are not checking for one time usage and even if there s one time use checking what if the hackers or spies enter the OTP / Authetication code before the actual user? More and more implementations should become hacker-proof and thwart the onLINE hacking/spying/hate/propaganda group.

If the data being transferred is being held in memory, the memory load cannot be predicted.

I think this is a very simple and nice approach for synchronizing data among applications like SimplePass that maintain the privacy of users and don’t need any kind of accounts and can still synchronize data across devices in a secure way.

Categories
Welcome

Classic example of corruption in India!

Bofors scandal was a major scandal where 64 crores INR was misused in a arms deal. India’s investigation agency CBI investigated for several years and cleared all the names and said 250 crores INR was spent. After few years the truth is only 4.77 crores INR were spent in the investigation. It’s like making claims of spending 4 times the scandal amount for investigation but in reality, very less was spent. So what happened to the remaining 245.23 crores INR? Would the CBI investigate CBI?

References:

Bofors Scandal – Wikipedia

CBI misled Delhi High Court that Rs 250 crore spent on Bofors probe: Supreme Court told

Categories
AWS C# Github

New accompanying Github repository!

A new Github repository has been created at https://github.com/ALightTechnologyAndServicesLimited/Internal for holding code samples for all the future content of ALight Technology And Services Limited‘s technical blog or technical videos.

Youtube Channels:

www.youtube.com/channel/UCfWg1fhujnIf6b621UZ_SGg

www.youtube.com/channel/UCBuu5ksejp5uPIJmPuReSTA

Happy development. 🙂

Categories
AWS

How to secure AWS account using MFA

Categories
Security Wordpress

WordPress Security And MFA!

WordPress Security And MFA!

After updating the website in December 2021 month-end to use WordPress, several internal updates and plugins were done for securing the website, improving the performance of the website. Over the past 30 days over 2,605 malicious requests were blocked using some security plugins. MFA was activated tying into Google Single-SignOn and Duo MFA. In other words logging into WordPress as admin requires Biometric authentication – YubiKey Bio. The useful plugins were Duo Two-Factor Authentication, Social Login, Social Sharing by miniOrange, Shield Security. Currently, the free versions of these plugins have enough functionality. The pro versions have many more excellent features. Sometime in the future, I might consider the pro versions. But I would highly recommend anyone using WordPress to secure your WordPress websites using these plugins. Even if you don’t have a YubiKey Bio, I would still suggest securing your installations using Duo push notifications. The installation of the plugins and configuring are very easy and stright-forward.

WordPress Security And MFA!